We’ve had a lot of comments & questions on our blog post on how we encode video in preparation for uploading to Vimeo, which is the video sharing service we use. In this post, we’ll go more in-depth on what settings we chose & why, as well as a better way of getting the right codecs & settings up and running on your machine. This will probably work for other video sharing services as well, although we haven’t tested them.
Vimeo recommends encoding using H.264, which we do also, but we use the x264 encoder instead of Apple’s default encoder. We’ve found that videos that are encoded in H.264 using Quicktime sometimes have gamma problems or experience heavy banding. And who likes banding? As a side note, there are other ways of dealing with banding further up your pipeline – Nick Vegas over at Greyscalegorilla has a great post on this.
First of all: the hardware & software we are using. We use Macs and Compressor 4 as our encoding software – available on the Mac App Store – but our preset file will work fine for Compressor 3.5 (part of Final Cut Studio 7). If $50 for Compressor 4 is too much for you, you can still use Quicktime 7 Pro or any other encoding software of your choice that supports Quicktime and manually plug in the settings yourself. If you’re doing a lot of encoding, though, we’d strongly suggest picking up Compressor. If you have Compressor 3.5, then I’d strongly recommend setting up Qmaster to use all your machine’s processor cores. If you have Compressor 4, this is already set up for you.
If you’re using a PC, you should be able to install x264 on a PC and use Quicktime 7 Pro to encode on that platform. We do know, however, that Adobe Media Encoder doesn’t seem to work with x264 as of CS5.5. Hopefully this will change in the future!
Getting Ready & The Easy Way
Secondly, you need x264 on your system! Download x264 (scroll down a bit, it’s not the first one on the list), open the DMG, and copy the x264Encoder.component file to Macintosh HD/Library/Quicktime/ Be careful, though, not to copy this file to your user Library, which is located elsewhere at Macintosh HD/Users/YOURUSERNAME/Library/ otherwise it won’t work!
Now, if you are using Compressor, download this file, unzip, open it with Compressor, and drag&drop the presets into your Custom settings. Four presets, one of each standard frame rate – 29.97 & 23.976 (24p) per standard HD resolution – 720p & 1080p. Also included is a preset which should automatically set your output resolution and frame rate based on your source. Now you have them saved for the future and you can go ahead and use them!
Tweaking & Getting Dirty
So what if you want to encode 1080p? Use a different frame rate? Use different encoding software? Tweak it in other ways? Well, let’s get into it!
You’ll have two major dialogues you’ll have to set for your encode: 1) the Quicktime settings window, and 2) x264 preferences.
Quicktime Settings
These screenshots are from Quicktime 7 Pro, but the options you encounter in other encoding software should be similar. Compressor has even more options, for a good overview of that check out the help files.
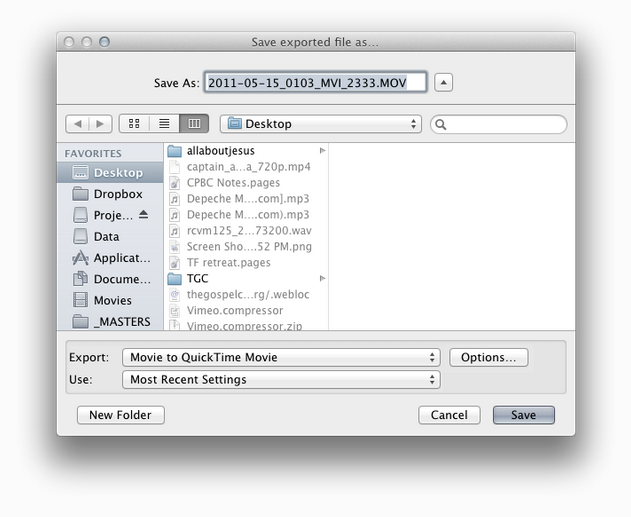
Set your Export drop-down menu to Movie to Quicktime Movie, since x264 is happiest in a Quicktime container. Hit Options.
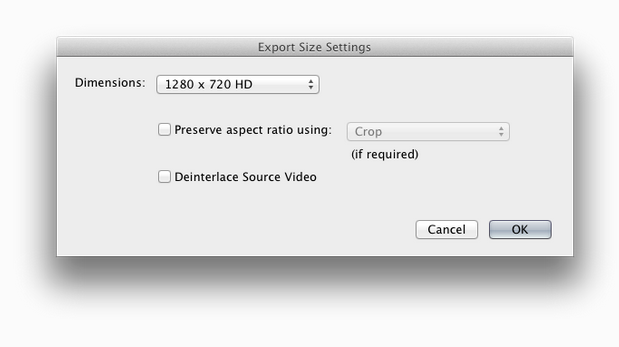
Now, you’ll want click Size under Video to set your resolution. Compressor native will automatically set the resolution based off of your source. Make sure to set your resolution to a size that fits your footage’s aspect ratio – or, if you want to intentionally crop or letterbox your image, select one of the Preserve Aspect Ratio settings. Letterbox will fit your video within the size you set and put black bars around your video. Crop will cut off edges of your video to make it fit the resolution you set, and Fit Within Dimensions will automatically resize your output Dimensions to most closely match the Dimensions you input.
You’ll want to check Deinterlace Source Video if you have an interlaced source. Web/computer video is always progressive, and so you’ll want to output as that.
Usually the aspect ratio on all new cameras is 16×9, of which standard resolutions are 1280×720 (HD 720) and 1920×1080 (HD 1080). We find that, for most internet video, 720p is an excellent tradeoff between resolution and most people’s internet connection speed, as you’ll need to up the bitrate substantially for 1080p – more on that later.
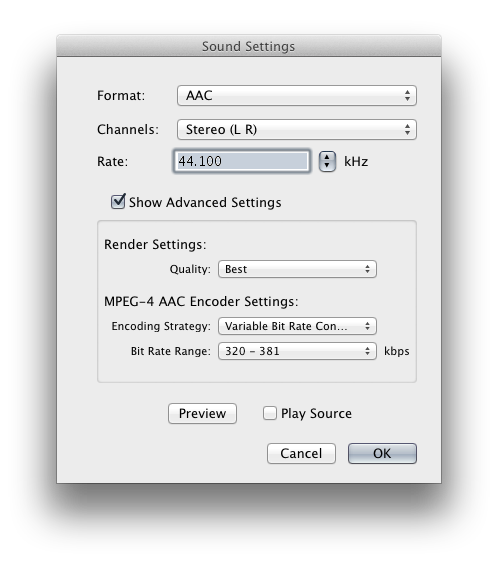
Under Sound, click Settings. Use AAC and Stereo. Currently the highest Rate Vimeo supports is 44.1kHz, but other sites might supper 48kHz. Vimeo does, however, support a maximum bitrate of 320, so I’d recommend that. Set Quality to Best, as encoding audio doesn’t take much time at all – might as well do the best job you can do on this!
Now, back under Video, click Settings. This is where you get into the nitty-gritty of the video encoder. Set the Compression Type to x264 – if you have it installed in the correct location it will show up. Set your Frame Rate to match your source – if you want 23.976, which is HD 24p, you’ll have to set it to Custom and enter it manually. You can set your Key Frames to the same as your frame rate – a keyframe every second usually works well. Set Encoding to Best quality (Multi-pass).
Your Data Rate will depend on your resolution and the complexity of the subject. Increasing the bit rate will get you a better quality picture at the expense of file size, so this is something you’ll have to balance out for your particular need. For video or film, 2000kbits/sec works well for SD, 5000kbits/sec is recommended by Vimeo for 720p, and 10000kbits/sec for 1080p. We usually go 8000kbits/sec for 720p – I have a fast upload speed to upload bigger videos, and it’s a nice feeling knowing that you are giving Vimeo extra bits to work with 🙂
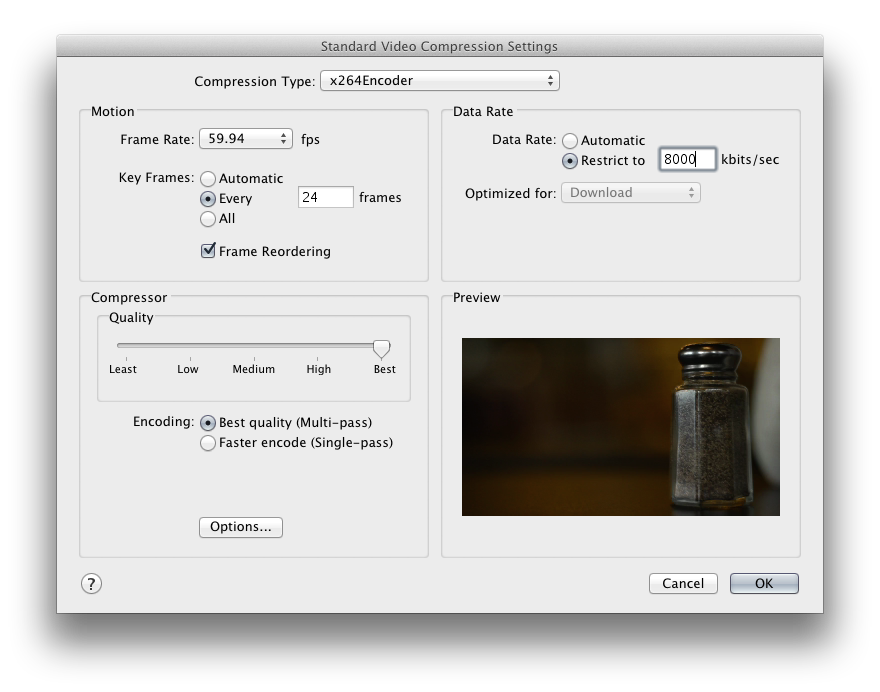
And here is where the real magic happens! Click Options at the bottom, and this will open the x264 compression settings.
x264 Settings
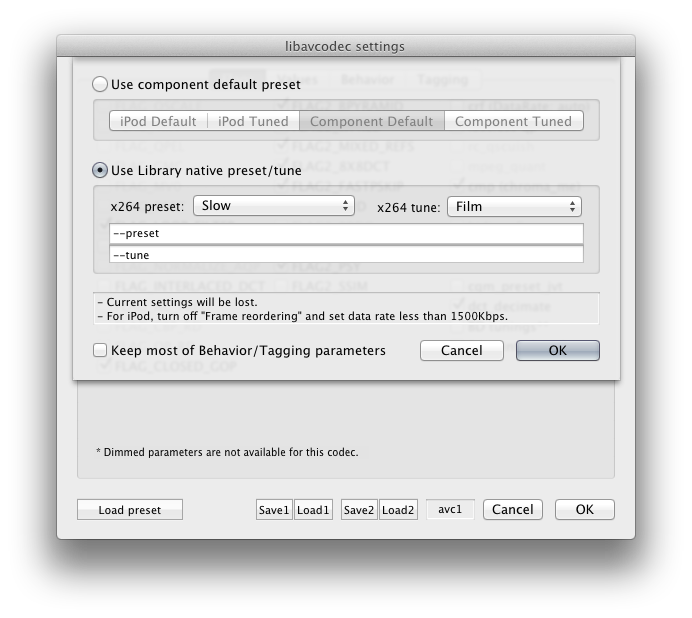
There’s a lot of settings here, but don’t worry, there are presets included in x264 to get you up and running. Click Load Preset at the bottom left.
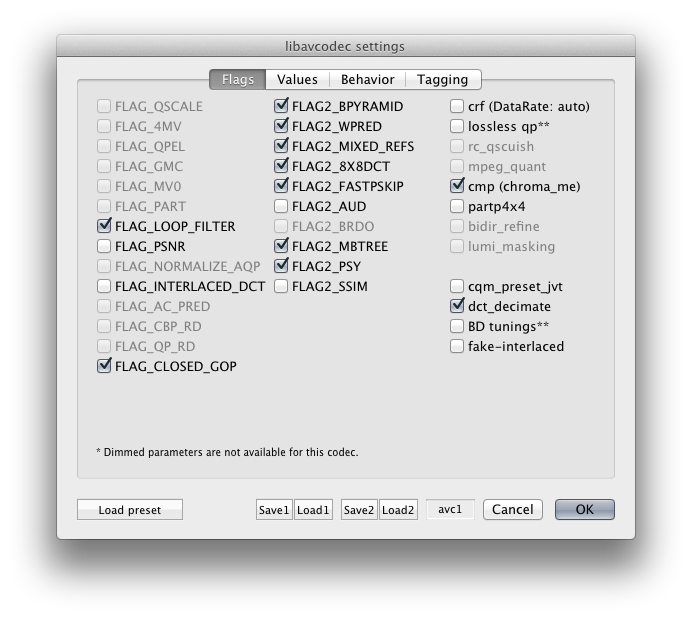
This will give you some tuning presets. x264 Tune will tune the encoder for different subjects – Film, Animation, Fast Decode, etc. x264 preset will set various settings that will either slow down or speed up the encode at the expense of encoding quality. We have fast machines so we select Slow, but you can try different speeds and find out what works best for you.
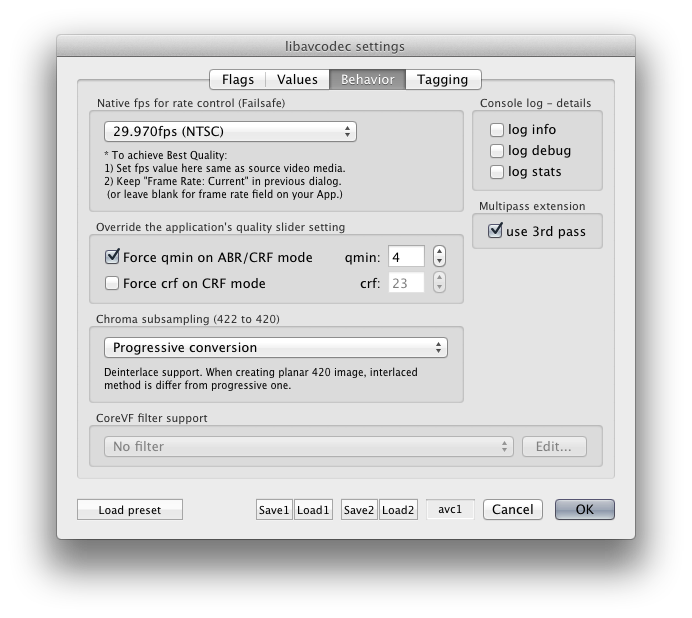
Usually you can skip the Values and Tagging panels – there may be some things in there you might want to adjust. Go to the Behaviour tab, and here you’ll select the same frame rate that you selected in Quicktime Options. Notice the information it provides you on how to achieve best quality. We always select “use 3rd pass” – it doesn’t seem to slow down the encode much compared to the Apple H.264 encoder, and results in a better encode.
And that’s it! Click OK to exit out of the dialogue boxes, hit Save, and it’ll render out your clip. Have fun, and feel free to ask questions!
Pingback: Best Compressor Settings for Vimeo « Transposition Films
Hi.
I just did a test with your preset for compressor and I got the same file size I get with H.264 at the same compr rate..I thought I will get much smaller file size at same quality…is there something I’m not doing right? can you please explain…
thanks
I assume by compr rate you mean bitrate? If you use the same bitrate between H.254 an x264, you’ll get almost exactly the same size file. Bitrate determines the maximum bits per second a compressor will use, and the compressor will use whatever it’s allowed to use which is why the file size will end up being very similar. However, compressors will use the available bits differently, which is why x264 is better – you’ll get a better-looking image with the same number of bits – filesize – than you would with H.264. Does that make sense? If you want a smaller file, decrease the bitrate. For 720p, anywhere between 5000kbps and 7000kbps should be really good, but you can go lower than that if you really need a smaller file. Again, decreasing the bitrate with x264 should usually get you a better-looking file than an H.264 render using the same bitrate.
ahhhh….I get it now. I htought same bitrate will give me smaller size…but i understand now.
I was using 5000mbps H.264 for 720p and still wished my file size will be smaller, because internet speed in the south is no very good…but I didn’t want to go lower than 5000mbps.
glad I found your page and the presets..thanks a lot.
Take care.
Always a good day when one learns something useful! 🙂
Yeah, specifying your bitrate will always get you a certain file – it does stand for kilobits per second, after all. If it is really difficult with your internet, you could experiment with a lower bitrate to get a smaller file size. Good luck!
Bro! long time no see! Just finished doing a video and releasing it on Wednesday. Super stoked that you put this info up. ill shoot you a link when its live.
Cheers,
J
Awesome!! Looking forward to it. Loved your cover of “Chicago!”
Can you tell me more about this:
“Set your Export drop-down menu to Movie to Quicktime Movie, since x264 is happiest in a Quicktime container”
I was thinking to use x.264 to encode video that will be using the video-js library for playback, and I’m pretty sure that requires an mp4 container.
Are you saying x.264 is happier in a .mov container? Or does it still work fine in an .mp4 container?
Thanks,
Blair
By ‘happiest’ we just mean that it’s worked well for us. It could very well work just fine in an MP4 container, but we haven’t tested that. Let us know if it works!
You said that x264 doesn’t work on Adobe Media Encoder CS 5.5. What about the Squeeze “plugin” that works on the encoder???
Are you referring to Sorenson Squeeze? I’m not sure about that, I’ve never used Squeeze. It looks like the plugin just uses Squeeze’s implementation of H.264, not the x264 encoder. I could be wrong though.
Amazing quality and almost the size of H.264. I can not understand how this is possible.
More efficient encoder I suppose! But shhhh – we shouldn’t be asking too many questions of magic 😉
Hi Ryan! Great tutorial! Sorry for my english, I’m writing from Italy.
I used your method and it’s so good for details.
I compared the original prores file, the h264 and the x264.
It’s true that the x264 maintain a lot of details, almost like the original file, while the h264 spread a little bit the colours.
However I noticed that x264 lose a little bit of black compression, that’s why it’s a little more grainy and have less saturation than the original.
Did you notice that?
I’m making something wrong?
Cheers!
Bye!
No problem! Nice work comparing them all – I haven’t gone into that kind of detail but I totally believe those results could be possible. I’d like to see your comparisons if at all possible?
I am still exploring but I wonder why you set it 24 frames. I am in PAL land so i would prefer 25 is this wrong ?
Regards
Finnur
I just set it to match my source record frame rate, which usually matches film at 24p. If you’re rolling at 25p, just set to that. Likwise for 29.97p, etc.
Thank you so much Ryan, just last question. I see that you have set one parameter to “film” since I am using 25 I have set it to none, is that right ?
No problem! Actually, the x264 Tune parameter specifies the source media type. I select film for stuff shot on video or film, but you can select other Tune selections for animation or motion design, for example.
Hi Ryan, sorry to be late.
Here’s a link to see my comparisons.
I would like to know your opinion.
http://dl.dropbox.com/u/7760278/Vimeoh264comparisons.zip
Bye.
Thanks.
Michel
Looks like the gamma curve went off at some point there. What software did you use to encode with?
Compressor
Hm. In the Tagging page in x264, try checking “Add gamma 2.2 (SD/HD content” Does that change your results?
Says that it will do the following:
– x264: Tags in container level and also stream level.
– xvid/mp4v: Tags in container level only.
– Use gamma only if source is not tagged properly.
Reference: http://developer.apple.com/quicktime/icefloe/dispatch019.html
Here it is. It looks better… What do you think? What does it change?
http://dl.dropbox.com/u/7760278/Vimeoh264comparisons_gamma2.zip
Hm, still looks exactly the same as the original x264 render you sent. It should change the gamma curve (generally the mids of the image), which currently looks boosted beyond what it’s supposed to be. H.264/x264 on the mac has had this gamma tagging issue for a long time and I’m not sure exactly the details around it, nor how to fix it… Not sure what is happening there…
Hi Ryan,
awesome tutorial. I’m trying to use your technique to try and get some equality between the .mov file that is rendered to my desktop and the washed out version that vimeo turns it into. I’m using a mac and wonder if you have any thoughts on how to get some equality between what you see on your computer compared to what will end up in the browser?
I understand color profiles etc. with my background in photoshop and photography but would love to work out how to get some similarity between vimeo and my mac screen. It’s not a browser issue because when I drag the file from my desktop to my browser it looks fine. Any thoughts would be very welcome.
Sounds like you’re having gamma issues as well! What do you edit and render with previously (aside from x264? What camera was the footage shot with? Basically – what does your workflow look like? Depends on all those things. Edit/rendering software usually figures out any colorspace issues, but of course things can go wrong.
Thanks for the article about this, I’m always trying to find the best way to upload to vimeo. But after doing this, my video does look less washed-out than it does when exporting straight to regular H264, but there is a heavy grain present throughout the whole video. Any idea why? I’m exporting a stop motion video shot on a DSLR, converted into PRORES422 clips, exporting out of final cut. 24 fps. Which is also weird, because this x264 option does not have a 24fps option… only 23.975. Any thoughts? Thanks.
Interesting! Haven’t heard of grain/noise being added as a result of compression, unless you’re seeing compression artifacting instead. What bitrate qre you encoding at? Can I see your clip? Also, your DSLR actually records at 23.976fps – Digital HD is not exactly 24p like film is. It’s actually 23.976. Editing software sometimes calls it 24p, and sometimes it’s exactly at 23.976. It can be a bit confusing.
great tips, thanks! just wondering what resolution you’d recommend for SD 4:3?
“Usually the aspect ratio on all new cameras is 16×9, of which standard resolutions are 1280×720 (HD 720) and 1920×1080 (HD 1080). We find that, for most internet video, 720p is an excellent tradeoff between resolution and most people’s internet connection speed, as you’ll need to up the bitrate substantially for 1080p – more on that later”
Standard def would be 640×480 square pixel, or 720×480 with the normal DV NTSC 0.9 pixel aspect ratio. Just use whatever the source media is set to though.
I have followed all your instructions, but when I try to convert using compressor 3.5. I keep getting failures during conversion and the error says Codec not installed. I have installed the x264encoder.component file into the proper folder. Am I missing something else? Any help appreciated. Thanks
Sorry for the late reply; been out shooting with sparse internet the last number of days. Are you able to set settings in the x264 dialogue box from within Compressor? You made sure to install it in Macintosh HD/Library/Quicktime/ and not Macintosh HD/Users/YOURUSERNAME/Library/? Failing that, perhaps it’s a permissions issue – try running Repair Permissions on Macintosh HD using Disk Utility?
Could you make two downloadable Compressor 4 presets for 1080p similar to the ones you’ve made available for 720p? Thanks for the help with x264, also.
No problemo! The zip file now includes a 29.97 and 23.976 preset for 1080p
First of all, better result for my movie on Vimeo I have never seen. Just one question. Do I gain anything by set 8MBps to higher level ?
Great! Glad it is working out for you. I don’t think you gain much by pushing it must past 8mbps for 720p – Vimeo will re-encode it for bitrates higher than that anyway. In fact, I think they actually recommend 5mbits. The only advantage of encoding higher is giving their encoder more bits to work with, so while it may help, you probably won’t see much difference.
Thank you so much I think I stick with my settings. It is hard to get best better.
Good day. Great setting. I have been using it on my MAC Mini with Compressor 3 and worked great. Now I just configured it on my macpro with compressor 4. I use your 1080 24fps present and I am getting an error, “3x encoder type unavailable”. If I use any other apple preset it works just fine. Any ideas what is causing this error? Thanks for your help…
you’ve probably tried the obvious – reboot, reinstall x264, etc.? does a preset you create yourself with x264 in Compressor work?
Great tutorial! Might I just say that I love that you have Depeche Mode songs in one of these screenshots. Great band.
Agreed!! Glad you picked up on that 🙂
Great information. I have been using the x264 plugin for several months now and just recently realized it is no longer being developed for quicktime.
This makes me sad because I have been able to use it directly from FCP X to Compressor, thus avoiding having to create a master file which would be necessary if using Squeeze or some other encoder that uses x264. One less re-encode is always good. It is open source and the developer left his source code available but so far it looks like nobody has picked it up.
Yeah, I hear ya. I’m following the development of x264pro for Adobe Media Encoder for Mac, but unfortunately it does look a bit pricey as well.
http://www.x264pro.com/
The “Vimeo.compressor” file in the zip crashes Compressor 3.5 for me, any chance you could make your presets to droplets and put in a zip for me?
No problem! The zip above now includes droplets as well.
Great thank you!!
Please let me know and you may have answered this in your instructions….? But if I purchase Compressor 4 and I’m NOT on FCPX, but FCP 7…. can the Compressor 4 download be installed and used on FCP7???
It seems as if Compressor 4 can be used with Final Cut Pro 7, but not easily. Maybe have a look over here…
https://discussions.apple.com/thread/3134867?start=0&tstart=0
Dear Ryan,
I downloaded the x.264 from the link you provided and installed the component per your instructions. However, When I click on OPTIONS, I don’t see LOAD PRESET. Instead, I see ‘iPod Default’. Any idea why?
Thanks!
Sorry, think we had missed this comment! Have you been able to figure it out in the meantime?
I’ve learned, No, compressor 4 and fcp 7 do not like eachother…BUT you can use compressor 4 with quicktime, which… just export a quicktime of your finished project from fcp 7–and then open your quicktime with compressor 4. wala!
On Vimeo they say that Frame Ordering should be turned off. What is you opinion ?
Regards
Finnur
Agreed – frame reordering should be turned off.
Also, Vimeo has updated their compression guidelines! Check out some of the changes. https://vimeo.com/help/compression
Thank you very much. Just another question. Vimeo say (IMPORTANT) set bitrate to constant not variable. I can not find an option for this in my x264 settings.
Best
Finnur
No, it actually suggests you use a variable bitrate when encoding. What it does say is to always choose “constant” frame rate instead of “variable” frame rate. And I’m not sure what encoder would allow you to choose a variable frame rate. Frame rate should always be constant. And it’s a good thing x264 doesn’t give you an option for variable frame rate 🙂
Thank you so much, so everything is clear now.
Best
Finnur
No probs! Happy encoding 😉
Hi Finnur Here a again. Just one question more. I see that you use Library native/ tune: x264 tune to Film. There are more option, such as none. Is there a specific reason to use Film instead of none ?
Regards
Finnnur
Here, check out this link for an explanation of the different settings. http://is.gd/0C9uAu
Thank you again for the information, I do not like grain and film look done with video camera. So I stick with none.
Best regards and thank you for bringing this codec to us
Finnur
I go through all the steps. But when I hit submit, after a few seconds it says “failed”. I repaired permissions on the HD disk as well. Any help would be appreciated! Thanks.
Whoa, that could be almost anything… is it only when compressing with x264? Double-check your settings? Have you tried different kinds of source codecs? What version of Compressor are you using?
Hi Ryan! Lots of thanks. By now I have the best compression that I never managed with h264. In a few moments, on Vimeo. I think it will work ok. Really fantastic!
excellent! glad it’s working out well for you.
Hey Ryan,
Thanks for these amazing tutorial. For some reason I can’t find the button to bring up the “tune” screen where you pick film setting. Where is this? Is it in the flags screen?
I’m on compressor 4.
thanks!
j
Hey James! Glad you got it up & running.
It should be in the Load Preset button, lower left corner.
Hi
Great info. I am currently figuring out compression for a fotomagico still slide show converted to pro res 422 hq.
Uncompressed size for 1920/1080 is 4.28gigs.
Here’s a 1280/720 export with Mpeg Streamclip compression on Vimeo, size 715 mgs:
https://vimeo.com/72428228
So I’m trying to compress that further with compressor, and at the same time experimenting with 1080/1920 compression, as I will shortly thereafter post a documentary movie.
Now when I download the droplets, the two 1080, although marked 24 and 30 come out BOTH as 23.976? No 29.976 to be found in the droplets.
Anything I’m doing wrong? I downloaded three times for same results. ANy difference anyway between 24 and 30?
Thanks,
Pascal
Hey Pascal,
Yes, you’re right. That is because I set all the presets to automatically adjust the frame rate setting based on the frame rate of your source material. This means that the different frame rate presets are superfluous – you could just keep one of each 720p and 1080p versions and you’d be fine.
You can see this in the Inspector window if you go to Encoder > Video Settings. You’ll see that Frame Rate is set to Current. Therefore, if you drop in a source video at 29.97, it will encode the output at 29.97, and likewise for 23.976.
There is a difference between 24p and 30p. Film is usually 24p, and TV at 30p (at least in North America!) You should pick your frame rate based on your vision for the piece and there is lots of info on the net as to which frame rate you’d choose. Also, it’s really dicey to converting 24p to 30p, and even more difficult to go from 30p to 24p, so you want to avoid this if at all possible.
Hope that helps!
Thanks. Yes.
FYI your Droplets have a bit of a hicup.
when you drag the Vimeo HD 1080p 30fps into compressor it is actually named “Vimeo HD 1080p 23.976” But the Settings are correct just the name is wrong.
Aha! You’re right. Thanks for the note – I’ve gone and fixed that.