Our recent film “Jesus is the Centre,” which we produced for Westside Church, has been received very well and we have enjoyed the responses and feedback from everyone. We’ve had some requests for a behind-the-scenes look at the piece, so here you go!
Westside Church moved into The Centre (previously The Centre for Performing Arts) in Vancouver August 6th, 2013. A month before that, Westside asked Josh & I if we would be willing to create a film to be shown at the first gathering at the new venue. As we are both members of Westside Church, we were of course totally fired up about doing that!
We actually created two films to this end. The goal of both pieces was to tell the story of ministry at Westside in its local context of the city of Vancouver. One was this launch film, while the other one was this more informational piece that was released earlier in September.
Early on, knowing that the building was named The Centre, an easy direction was to point to Jesus being the centre of what we do, rather than a building. A new building is definitely nice, and while we did not want to downplay the significance of that move, it is still only a tool to serve the mission of Jesus. That begun the thought for the whole film and carried it through to completion.
I spent a lot of time researching and finding samples of visual metaphors that I thought would work for this piece, and built quite a sample reel of stills and sounds that I felt would work well. The mood of much of Salomon‘s work we liked very much, and visually, Danny Yount’s SEMI-PERMANENT 2013 TITLES stood out. Two main visual metaphors rose to the surface. One was the concept of centre, which led to the mirroring visuals & centre justified type. The other was urban transportation as a metaphor of the church as a movement, moving forward in mission. I shared these ideas with my designer, Tiffany Haines, and my composer, Chris Pulsifer, near the end of July. This gave us the chance to spend time on revisions while not being pressured for time, as well as giving them time and space for concepts to simmer in the background.
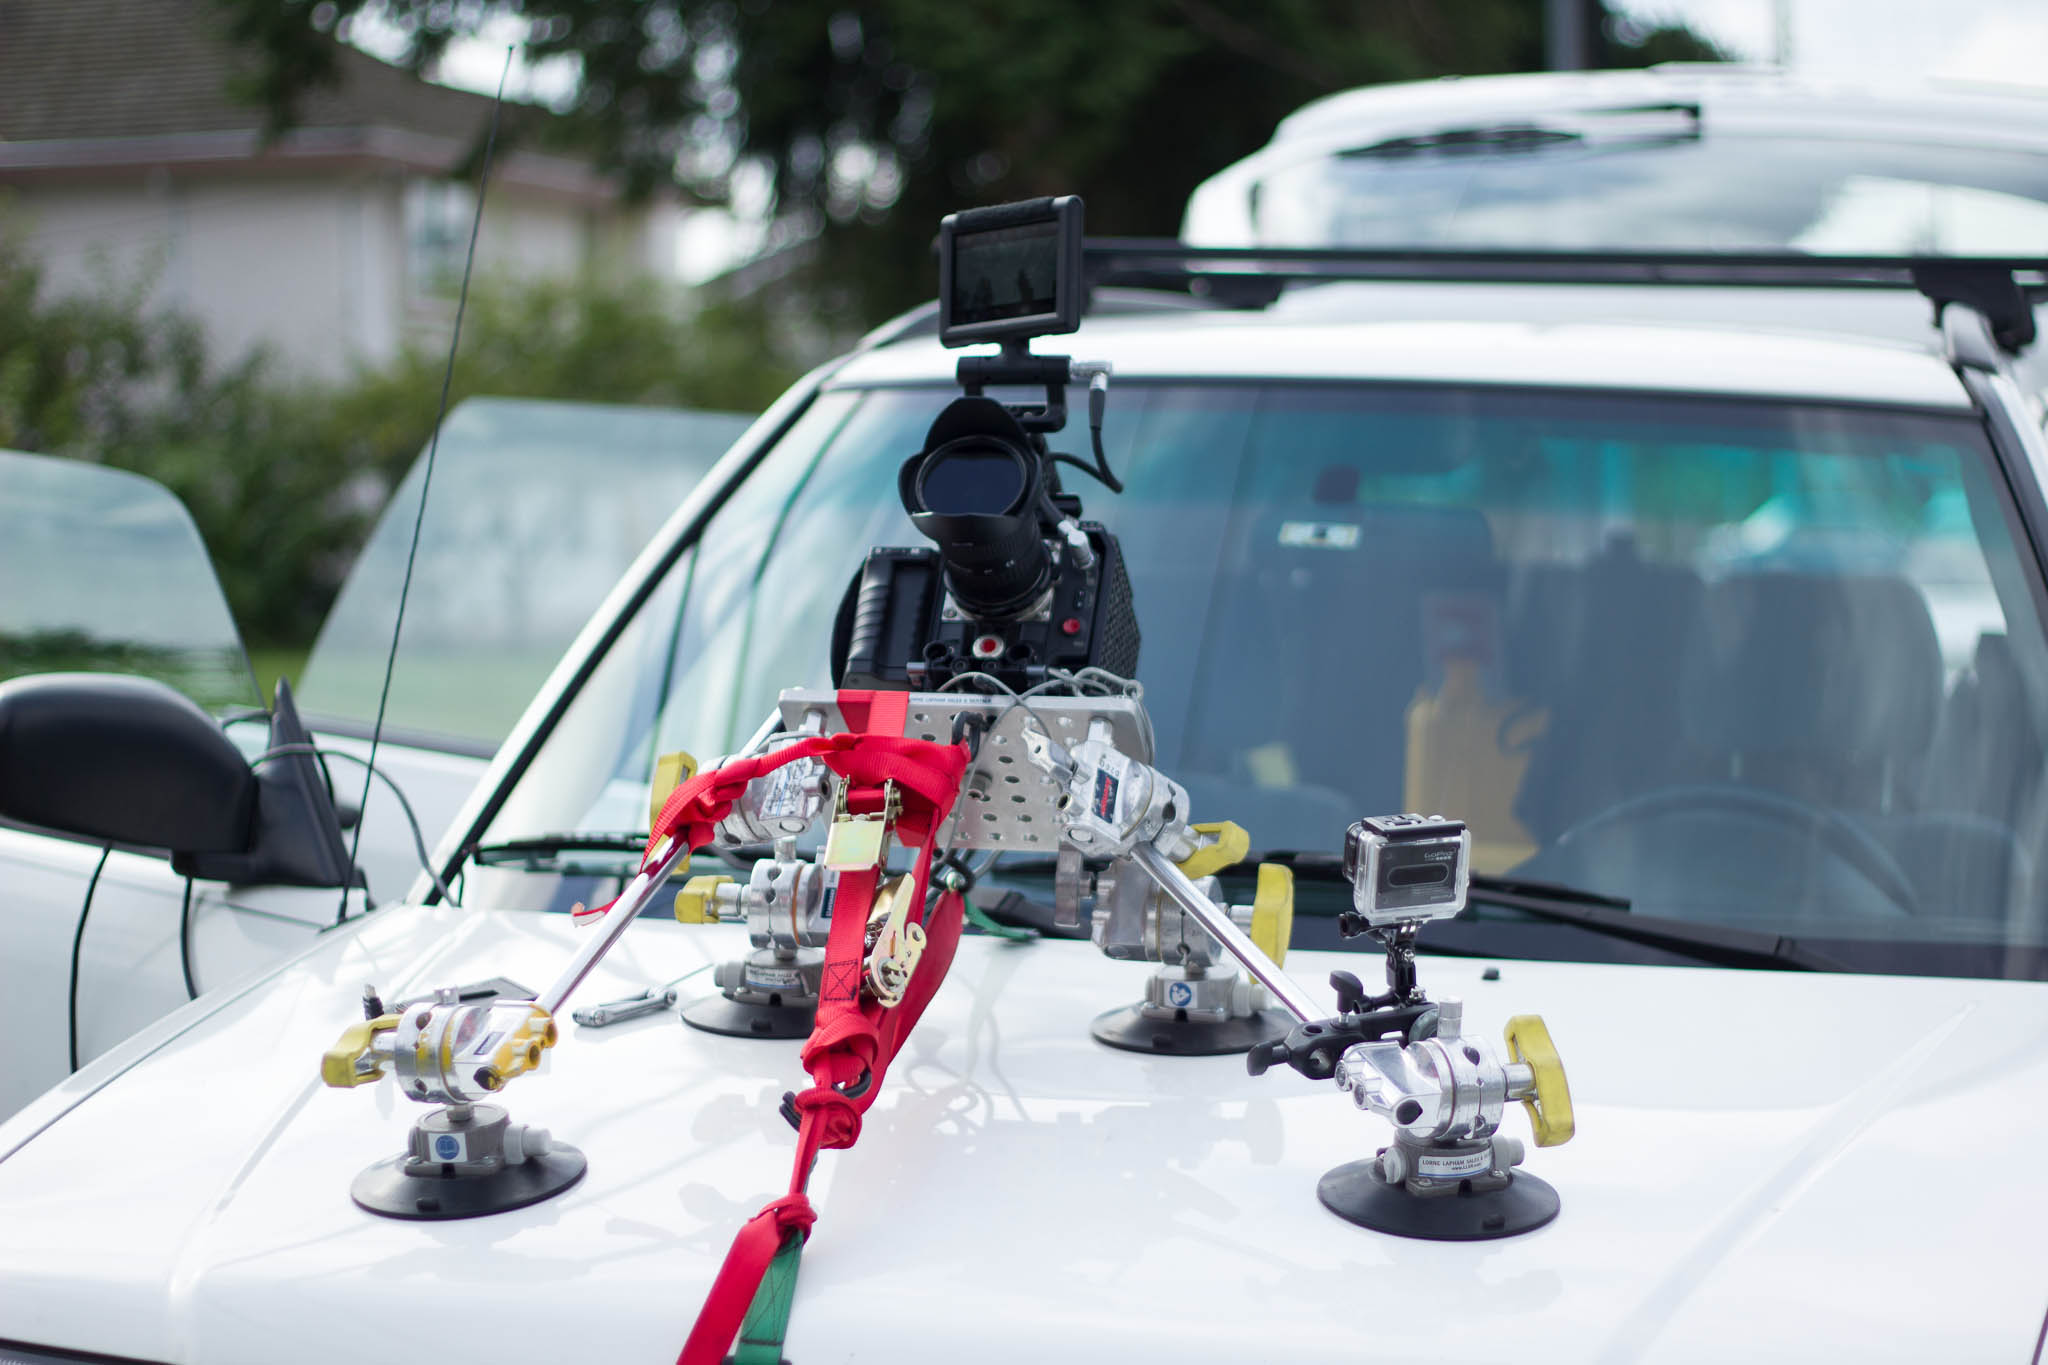
We shot the film over a few days in August + September on a Red Epic. Most of it was shot on a Tokina 11-16, especially the driving shots. Otherwise, we used a Canon 24-70L and 70-200L. Many people have asked how we did the aerial shots near the beginning. These are actually from a Gopro Hero3 hung underneath a helicopter from another shoot we worked on. We simply asked to use the footage and the clients gladly allowed it.
We rented a camera car mount for the driving shoot day. Using a tripod head between the car mount and the Epic turned out to wiggle too much while driving, and while it would have been nice to adjust the camera tilt & pan with a head, we ended up mounting the Epic directly to the car mount to provide maximum rigidity and shot stability. We ran a HDMI cable into the vehicle and monitored the shot from our Marshall monitor, and used a Redmote to remotely start/stop the recording. We rolled 120fps 5K WS for all the driving shots so that we could accomplish our speed ramping shots, so having the ability to remotely record saved us a lot of disk space in the end.
After that came post! Between editing, grading, denoising, speed ramping, stabilization, and type & design we had our work cut out for us. The first step was doing a full resolution 1/2 good debayer render from Redcine-X to Prores LT. These we used to build the rough cut in Premiere CC, along with roughed-out speed ramping and framing (none of the mirroring work, though). This step, besides the edit, was mainly to pace out the piece and nail down the content of the text.
Once the rough / content edit was approved, I exported an XML from Premiere and opened that up in Redcine-X. I grabbed the list of Red files used, removed the in/out points that had come from Premiere, and did a one-light grade on the clips. Also, I set all the clips to RedLogFilm, as part of the grading process that will be explained shortly. These clips we rendered out to full resolution, full debayer Prores 4444 files.
I sent the edit from Premiere to AE using Dynamic Link, and then swapped out the Prores LT edit files for the Prores 4444 files I had just rendered out. Then the finishing work begun!
For many of the shots, the first step was the speed ramp. I simply used After Effects’ Time Remapping function to hit the exact timing I wanted, using the rough setting in Premiere as a reference. Then, most of the shots required stabilizing. Driving down a street for blocks at a time means that a speed-ramped footage by itself looks pretty rough. I could have stabilized the original shot, but as tracking dozens of minutes of 5K shots at 12ofps would have taken way more time than was necessary, I rendered out the time-remapped shot and replaced it within After Effects.
This shot I then sent to mocha AE, and set a planar tracker to track the clouds. I knew the sky wouldn’t change much, and if I had a perfectly stable shot, the clouds would basically remain locked in position. Once mocha had tracked the footage, I copied and pasted the keyframe data back onto the footage layer in After Effects, keeping only the Anchor Point and Rotation data – I didn’t need the Scale and Position info. Important note, though, was that the Rotation data from mocha AE needs to be inverted for After Effects, so I simply created an expression to multiply the Rotation keyframes by -1. Then I parented the footage layer to a null object, and used that to scale up or move the footage layer as necessary to avoid the footage moving beyond the composition boundary.
Once the shot was timed and stabilized, I moved onto the mirroring. The footage had already been pre-comped during the stablizing process, as it allowed me to keep the original time-remapped footage, before doing the render & replace, as a disabled layer. I set the Anchor point to where I wanted the mirror to occur, duplicated the footage, masked the half of the shot I wanted mirrored, and set the horizontal scale to -100. Boom! A perfect mirror. I did have to sometimes mess with where the Anchor point should be, so that as the shot pushed in, the shot wouldn’t appear to converge or diverge too much.
Next came denoising and grading. In the precomp, on the original footage, I denoised the footage using Neat Video’s fantastic plugin. Being GPU-accelerated, I found it pretty quick, even on 5K footage. After that plugin, I threw on Red Giant’s LUT Buddy plugin. This let me use a LUT from the new VisionColor OSIRIS collection as my base grade. Their LUT’s require Log footage, which is why I had set the footage to RedLogFilm earlier in the process. After the LUT was applied, I added Red Giant’s Colorista II before the LUT. This let me adjust the footage to the final look while viewing the changes I was making through the LUT.
I rendered out the whole piece to a TIFF sequence, then created a comp with the TIFF sequence & the music, which I then rendered to the final Prores 422HQ master file. Rendering first to a TIFF sequence meant that after watching the film, I could make tweaks where necessary, and only render out the segments I had changed to the TIFF sequence. Much less render time in the final stages.
The film showed on launch Sunday, September 29th, 2013 to a crowd of nearly 1,200 people. The day was full of excitement and joy. Here’s a bit from CBC News about the day.
[feather_share]
Good stuff guys!
thanks!